SELECT A BOOK:
SELECT A CHAPTER:
Exporting a Web Page
When you're satisfied with the preview, you can export a page as an HTML file and the associated image files.
To export a Web page:
1 Click Export ![]() in the Document Content palette to export.
in the Document Content palette to export.
2 If you want to change the default name of the file, enter a new name in the Export HTML text as: field. Be sure to leave the ".html or .htm" extension.
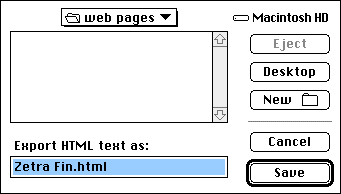
3 Use the directory dialog box to specify a location for the exported HTML file. Image files are saved in the location you specify in Export Preferences.
4 Click Save.
5 To view the exported Web page immediately, check Open in Browser in the Export Progress window. Your preferred HTML browser will display the HTML file as soon as it is exported.
Notes on exporting Web pages more than once
After you export a Web page, BeyondPress remembers its specified name and location. If you want to export a page with a different name or to a different location, click and hold on ![]() and choose Export As.
and choose Export As.
If you export a page more than once, and you modify some of the images stored in the Shared Images folder, an alert will ask you how to handle duplicate image files. To update the images in the Shared Images folder, click Replace.
Export Progress Window
When you click "Export," BeyondPress displays an Export Progress window which provides you with statistics about your Web page and estimated download times for five user bandwidths. Error messages are also displayed.
See Export Error Messages for more information.
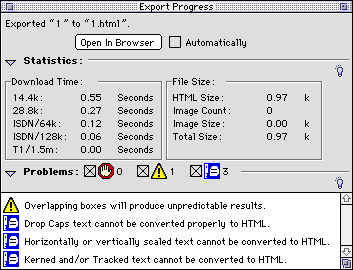
Click Open in Browser to see your exported page in a preferred browser application. Check Automatically to always see pages in a browser after export.
![]() Setting Preferences for Exporting | Preparing a Template for Exporting Web Pages
Setting Preferences for Exporting | Preparing a Template for Exporting Web Pages![]()
SELECT A TOPIC:
Previewing and Exporting Introduction
Setting Preferences for Exporting
Exporting a Web Page