SELECT A BOOK:
SELECT A CHAPTER:
Using Master Elements as Headers, Footers, or Meta Tags
Headers, footers, and Meta tags are created from the Master Elements you specify in the HTML pane of the Element Palette. They are added to all pages through Web Page Preferences. To override Web Page Preferences to add headers, footers, and Meta tags to individual pages, use Web Page Settings of the Attributes Inspector.
Web Page Preferences
1 Open Web Page Preferences (click Preferences ![]() on the Document Content palette, then click Web Page).
on the Document Content palette, then click Web Page).
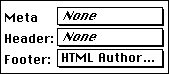
2 Use the header, footer, and Meta tags pop-up menus to choose from all the Master Elements saved with current preferences.
3 Click OK to close BeyondPress Preferences and save changes.
Web Page Settings
1 Open the Attributes Inspector (click on the Inspector ![]() in the Document Content palette: Authoring Mode.
in the Document Content palette: Authoring Mode.
2 Click on a non-item portion (or the pasteboard) of the Web page you want to edit. Web Page Settings will appear. The settings apply to the page whose page number is shown in the lower left corner of the document window.
3 Use the header, footer, and Meta tags pop-up menus to choose from all the Master Elements saved with current preferences.

4 Close Web Page Settings to save changes.
Note: See Adding Headers, Footers, and Meta Tags and Adding a Date and Time Stamp for more information.
![]() Using Master and Custom Elements | Creating Hyperlinks and Image Maps
Using Master and Custom Elements | Creating Hyperlinks and Image Maps![]()
SELECT A TOPIC:
Creating Custom and Master HTML Elements
Editing or Deleting Master Elements
Using Master and Custom Elements
Using Master Elements as Headers, Footers, and Meta Tags