SELECT A BOOK:
SELECT A CHAPTER:
Creating Master and Custom Elements
In addition to the seven default Master Elements in the HTML pane of the Elements palette, you can create your own Master and Custom Elements by combining text, HTML tags, and other Master Elements.
Click ![]() to import Custom Elements that you've created for other pages.
to import Custom Elements that you've created for other pages.
To define new Master Elements:
1 Open the Elements palette by selecting Extensis>BeyondPress>Show Shared Elements, or pressing Command-Control-S (Macintosh), or Control-Shift-S (Windows).
The HTML pane lists the default Master Elements and any new elements that you define. The default Master Elements can't be edited or deleted.
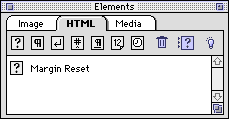
2 Drag the Custom ![]() icon into the Master Element List. The Edit Master Element dialog box will appear.
icon into the Master Element List. The Edit Master Element dialog box will appear.
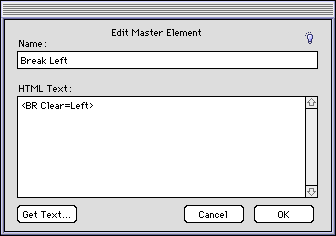
3 Combine the following techniques to define the Master Element in the HTML Text box:
* Enter up to 32,000 characters of text, or use the Get Text button to import a text file.
* Enter the name of a Master Element in {brackets} to embed it in the new Custom Element.
Note: The new Master Element you're creating will reference the Master Elements in brackets. If you edit a Master Element, the change will carry through all Master Elements that reference it. If you want brackets inside your Master Element text, type a backslash before the brackets: \{ \}. Otherwise, BeyondPress will interpret the brackets as references to other Master Elements.
4 Click OK to close Edit Master Elements and save changes.
To create new Custom Elements:
1 Open the Elements palette by selecting Extensis>BeyondPress>Show Shared Elements, or pressing Command-Control-S (Macintosh), or Control-Shift-S (Windows). Click on HTML.
2 Drag the the Custom icon ![]() into the Document Content List where you want to embed the HTML item. The Edit Custom Element dialog box will appear.
into the Document Content List where you want to embed the HTML item. The Edit Custom Element dialog box will appear.
3 Follow step 3 above.
4 Click OK.
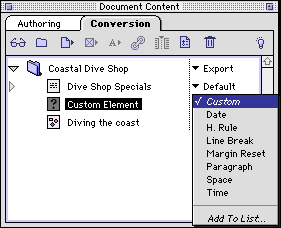
To add a Custom Element to the list of Master Elements:
Select the Custom Element in Content List. Choose Add to List from the Master Elements pop-up menu, which lists "Custom" and all the Master Elements.
![]() Adding Custom HTML Items | Editing or Deleting Master Elements
Adding Custom HTML Items | Editing or Deleting Master Elements![]()
SELECT A TOPIC:
Creating Master and Custom Elements
Editing or Deleting Master Elements
Using Master and Custom Elements