SELECT A BOOK:
SELECT A CHAPTER:
Cascading Style Sheets and Font Name Tags
Cascading Style Sheets allows you to specify fonts, text colors, and text and paragraph styles. Web browsers that support CSS display text according to your typographic specifications. Font Names Preferences lets you specify alternatives to specified fonts in case your audience doesn't have those fonts loaded on their systems.
To enable CSS and/or Font Name Tags :
1 Open Export Preferences (click Preferences ![]() on the Document Content palette, then click Export).
on the Document Content palette, then click Export).
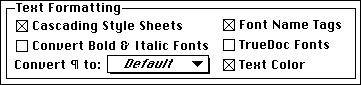
2 Select Export Preferences and check Cascading Style Sheets. BeyondPress will automatically add CSS HTML code to your exported documents.
3 By checking Font Name Tags, BeyondPress will write the appropriate Font Face HTML tags.
Note: If Cascading Style Sheets is checked, but Font Name Tags is not checked, the font names will be included in the CSS information written by BeyondPress upon export. Checking both Font Name Tags and CSS can be a good strategy if some visitors to your site use a browser that supports the Font Face tag but not Cascading Style Sheets.
4 Check Convert Bold & Italic Fonts to automatically apply bold and/or italic HTML styles to text in the bold and/or italic instances of a font.
Note: Some fonts are incorrectly marked as bold and/or italic by the manufacturer. If your exported text reflects incorrect bold and/or italic formatting, uncheck Convert Bold & Italic Fonts.
5 Check Text Color to automatically retain the color of nonblack text (for example, a red headline). The color of black text is controlled by the Text Color setting in Web Page Preferences.
6 Click OK to save BeyondPress Preferences.
<P> vs. <DIV> Tags
You have the option to use either Paragraph, <P>, or Division <DIV> HTML tags for paragraph breaks.
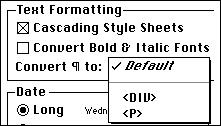
Netscape Navigator and Microsoft Internet Explorer both read <P> and <DIV> differently. Navigator 3.0 does not draw a traditional paragraph break when reading the Div tag, but breaks the line without spacing like a Line Break <BR>. Navigator 4.0 allows draws slightly more space between lines.
Explorer 3.0 applies a conventional paragraph break to Div tags, but allows nearly three paragraph spaces for <P> if CSS information is included in the document.. The Default setting when Cascading Style Sheets is enabled is <Div>; when CSS is not enabled, paragraphs by default are designated by <P>.
In general, use Default, or use <Div> when using CSS and designing for an audience using Explorer, and use <P> for a pre-Navigator audience.
To set Font Names Preferences:
1 Open BeyondPress Preferences and select Font Names. You can choose to list all the fonts on your system, or only the fonts in your document (by checking Show Only Fonts in Document when a document is open).
2 Identify the fonts you plan to use. Click on a font in the list and wait a moment until the CSS Font Info edit field appears.

3 Click on the text in the right column to activate the CSS Font Info edit field, choose alternatives to the fonts you're using, and separate them with commas. For example, if you're using AGaramond Bold, enter AGaramond Bold, Times, serif in the CSS Font Info field. In this example, if a Web user viewing your pages doesn't have AGaramond Bold loaded on their system, Times will display. If the user doesn't have Times, a serif font will display.
4 Click OK to save BeyondPress Preferences.
SELECT A TOPIC:
Cascading Style Sheets and Font Name Tags